
Spring Blooms from Cheekwood to Your Home
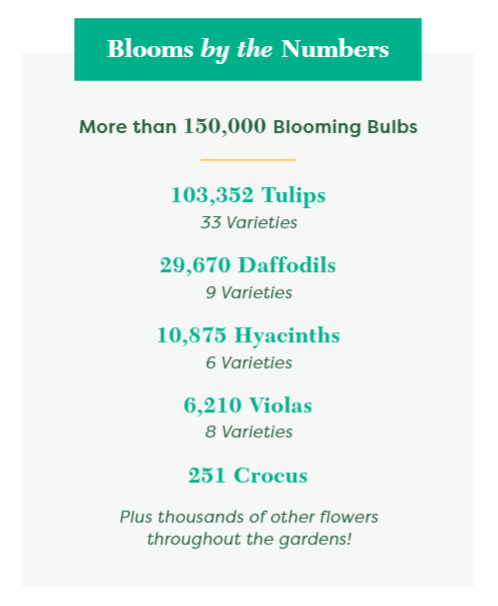
Each year, Cheekwood welcomes spring with Cheekwood in Bloom, a seasonal festival filled with over 150,000 flowers, wellness opportunities, and special happenings. The show features a variety of flowers including 100,000 tulips, plus daffodils, hyacinths, violas, crocus and many other blooms and flowering trees like magnolias and dogwoods. Every year the flower displays are beautiful, but this year there’s something even more spectacular as it is the first year Cheekwood has embarked on “theming” the tulip display.
We know that due to COVID-19 some people may not be able to visit our Cheekwood in Bloom display or activities this year in person, so we have brought Cheekwood in Bloom to you virtually!
We invite you to read on for more information regarding the inspiration behind this year’s spring plantings at Cheekwood and enjoy the video walkthrough with our Vice President of Gardens & Facilities, Peter Grimaldi.
If you are feeling inspired after reading about our Cheekwood in Bloom display, we hope you read on for ideas to freshen up your garden and your home! Our Plant Collections Manager, Shanna Jones, shares 5 garden tasks you should be doing this spring.
And your garden isn’t the only thing that can use some blooms this season! Celebrate the spirit of spring with a fresh spring wreath. Wreaths are great activities for crafters of all levels, from budding beginners to expert florists. If you’re looking for a charming way to brighten your door, read on!
Cheekwood in Bloom Display
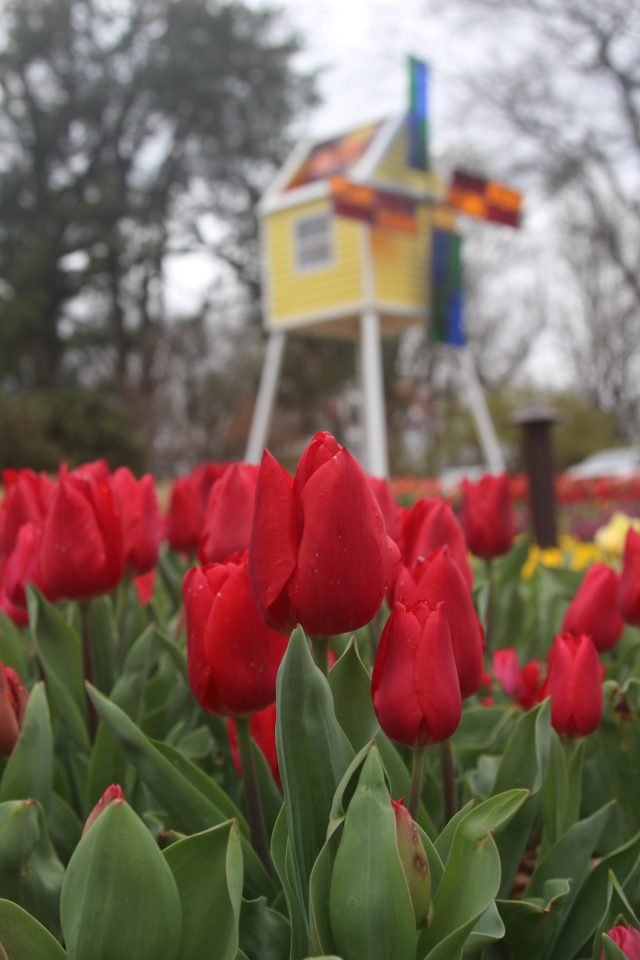
“The perennial challenge of creating novel beauty in the Bradford Robertson Color Garden each spring must draw on many sources of inspiration,” said Vice President of Gardens & Facilities, Peter Grimaldi, “and the creative spark for this year’s display came in conversation with new Vice President of Museum Affairs Jim Tottis as he effused the names of various artists and artworks relevant to the subject at hand – tulips! Specifically referencing George Hitchcock’s oil painting Bulb fields with windmill, c. 1890, the concept developed quickly from American Impressionism to rows of tulips planted in bands of color interrupted only by towering windmills.”
This year’s display was Dutch-inspired and makes a dramatic reference to Holland and the iconic imagery of fields of tulips planted in production. Visitors are greeted immediately by three-foot bands of orange, red, yellow, and pink stacked neatly behind the sidewalk that quickly sweep away to follow the curves of the Color Garden’s interior panel. Hyacinths and violas are overlaid in a checkerboard pattern of complimentary colors to further set off the very intentional expression of planted rows. The eye is not tied to the ground plane, however, as two giant windmills preside over the garden.
Abstracted from the same classical associations as the fields of tulips, the windmills reach over twenty feet toward the sky to catch the breeze and reflect the light caught by shimmering blades and prismatic roofs. A pair of smaller ‘kidmills’ feature telescopic, prismatic and bug-eye viewing tubes to activate the display and create an interactive experience for Cheekwood’s youngest guests and make a playful connection between classical beauty and the visible spectrum of light.
Originally conceived in the margins of a conversation about American art, the Blooms display will transport you directly to Holland or wherever your imagination may take you this spring.
Virtual Tour with Peter Grimaldi, Vice President of Gardens & Facilities
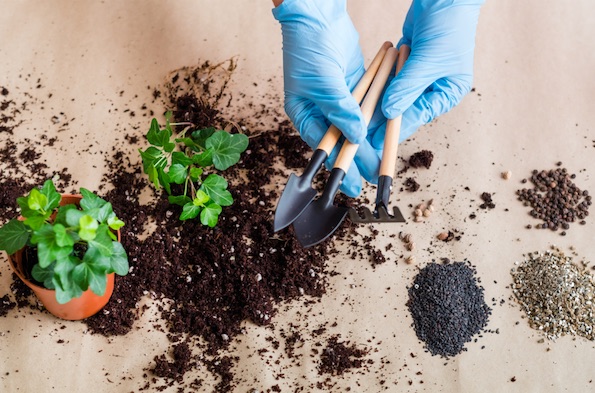
5 Garden Tasks for Spring
Now that you’ve learned a little bit about our Cheekwood in Bloom display, we invite you to use these tips provided by our Plant Collections Manager, Shanna Jones, to freshen up your own garden at home this spring!
- Fertilize acid-loving woody plants. It is best practice to fertilize blueberries, hydrangeas, rhododendrons, azaleas, and other plants in the Ericaceae family at least twice a year: once before they flower in late winter or early spring, and again after they flower in May or June. Remember: do not fertilize in fall. Doing so will create new growth that may not have time to harden off before freezing temperatures set in.
- Prep for vine growing veggies like beans and even cucumbers by constructing trellises, arbors, or tuteurs using wood and wire or whatever materials spark your creativity.
- Sow vegetables and other annual seeds inside before the last frost (normally mid April). You do not need a greenhouse to get ahead of the game! Simply choose a sunny windowsill or invest in grow lights and a multi-tiered shelf that can accommodate more space.
- Now is the time to plant seed potatoes. Growing potatoes in bags is ideal if you have a smaller garden or only a patio.
- Deadhead and thin out old wood from hydrangeas that bloom on new wood: smooth and panicle hydrangeas ( arborescens and H. paniculata). Do so before any sign of new growth, cutting back to 18-24” above ground. For bigger flowers, these hydrangeas can even be cut all the way back to the ground.
How to Make a Fresh Spring Wreath
Whether using plant material from your gardens, or picking some up from a local shop, we hope you draw inspiration from our Cheekwood in Bloom festival and enjoy making and displaying this beautiful DIY spring wreath.
What You’ll Need:
- 1 Oasis 12” Ring Holder (available on Amazon or your local wholesale florist)
- Sharp scissors, floral shears, or floral knife
- A bucket with water for plant material
- Small gauge wire (optional for wrapping stems of tuberous plants like daffodils and tulips to add stability)
- Fresh plant material
For this project, we used a combination of blooms purchased at a local wholesale florist along with stunning daffodils found in the gardens at Cheekwood. The color palette is primarily warm, using pinks, reds, and yellows, as well as pastels to celebrate springtime. You may wish to create your own design, using blooms from your own backyard. If you cut your own plant material, it is best to do so in the early morning or evening and then immediately put the items in water.
When selecting your plant material:
- Stick to a simple color palette and shift tones within the palette. For example, follow a warmer palette with reds, pinks, oranges, and yellows or conversely, choose a cooler palette using blues, dark greens, and deep purples. Keeping your color palette simple will allow you to experiment with textures, shapes, and sizes while still looking cohesive.
- Cut or purchase in odd numbers—odd numbers create visual interest.
- Don’t be afraid to ask for advice from your local floral shop. They can help with selecting aesthetically pleasing color palettes and a variety of plant textures and sizes for your wreath.
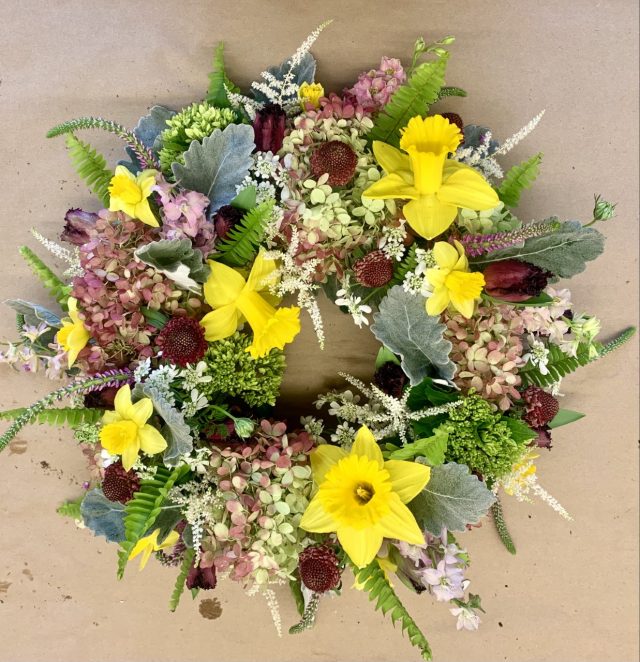
For this fresh spring wreath example, we used the following plant material:
Primary Anchor Flowers
• Antique Hydrangeas: 3-5 stems
• Mini Green Hydrangeas: 3-5 stems
Secondary Anchor Flowers
• Mini Queen Anne’s Lace: 5-7 stems

Showstopper Flower
• Large daffodils: 3-5 stems
Accent Flowers
• Small Parrot Tulips: 10-15 stems
• Larkspur: 5-7 stems
• Veronica: 7-9 stems
• Astilbe: 7-9 stems
• Scabiosa: 5-7 stems
• Small Daffodils: 5-7 stems
Foliage
• Dusty Miller: 3-5 stems
• Swordfern: 10-12 fronds
Directions:

1. Prepare your Oasis foam and flowers. Soak Oasis foam in cold water for at least 15-30 minutes. The foam keeps your blooms hydrated. Similarly, prepare your plant material by giving them a fresh cut with your shears or scissors. Put them in your bucket of water while you work.

2. Place your Primary Anchor Flowers to establish the overall shape and diameter of the wreath. In general, begin with your largest blooms and finish with your smaller pieces. Larger blooms should be used as anchors, taking up the bulk of the wreath space. Divide these pieces into manageable stems, no longer than 3-4″, to avoid poking through the Oasis foam. Cut the stems at an angle to create a point, which will make insertion much easier. When inserting the stem into the foam, push in a bit deeper, so the overall height of the wreath does not get too tall, too quickly. You will be able to build up the height with smaller pieces later.
The Antique Hydrangeas and Mini Hydrangeas serve as Primary Anchor Flowers for our example. Because hydrangeas have a conical shape, we angled them outward to keep them from sticking straight up.

3. Place your Secondary Anchor Flowers to continue filling space. When filling your wreath, work in a circular motion to ensure even coverage. Remember to use all the edges of your Oasis foam-front, inside, and outside. Just be sure to leave a gap on the inside of the foam—after all, that’s what makes it a wreath! Take a moment to hold up your wreath as you work to inspect your coverage. This is also a good time to make sure your stems are securely in the foam by giving a gentle shake.
We used Queen Anne’s Lace for our Secondary Anchor Flower.

4. Alternate colors and textures as you work. This helps keep your composition balanced.
These small Parrot Tulips perfectly balance out our color palette after the Queen Anne’s Lace.

5. Highlight your Showstopper Flower. Add the vibrant bloom that takes center stage early on in your composition. These flowers create eye-catching focal points on your wreath. Remember the rule of odd numbers and work in 3s, 5s, and 7s.
Naturally, we chose these large daffodils grown at Cheekwood as our Showstopper Flower!

6. Begin to vary the heights of your stems as you add your Accent Flowers. Continue with the general rule of cutting stems at 3-4″ long while beginning to experiment with varying the heights of your Accent Flowers.
Our Accent Flowers are pink Larkspur, purple Veronica, and white Astilbe.

7. Consider the natural shape and direction of each plant as you begin to add foliage. Every bloom will have curvature to it—that’s the beauty of nature! Embrace the shape and direction of each plant rather than forcing it to fit on your wreath.
This Dusty Miller adds unique texture and shape to our wreath.

8. Stabilize the stems of small, tuberous blooms with wire before inserting. While this is an optional step, the wire adds additional rigidity to the stem, which helps with insertion. Gently wrap some small gauge wire around the stems of any delicate tuberous flowers, like these small daffodils below.

9. Finish adding the details with your final Accent Flowers and foliage pieces. Take the time to add your finishing touches—it’s all in the details!
We finished our wreath with burgundy Scabiosa and vibrant green Swordfern.

10. Place your wreath in an area of indirect light and don’t forget to keep it hydrated! Check the moisture in your Oasis foam daily and submerge in water as needed to keep your blooms looking their finest.
Want to see these beautiful blooms for yourself? We’re open daily during Cheekwood in Bloom, and we’ve extended our hours until 7 PM through April 6. Capacity is limited, and advanced reservations are required.
See all of our happenings, wellness opportunities, exhibitions, and more here!
Learn more about Cheekwood in Bloom
Cheekwood in Bloom is presented by
